 KawAZ
Worldwide version
KawAZ
Worldwide version
KawAZ
Worldwide version
![]() Latest version 1.24W, dated 2 August 2004: Decimal - Deg. Min. Sec. Calculator
function added.
Latest version 1.24W, dated 2 August 2004: Decimal - Deg. Min. Sec. Calculator
function added.
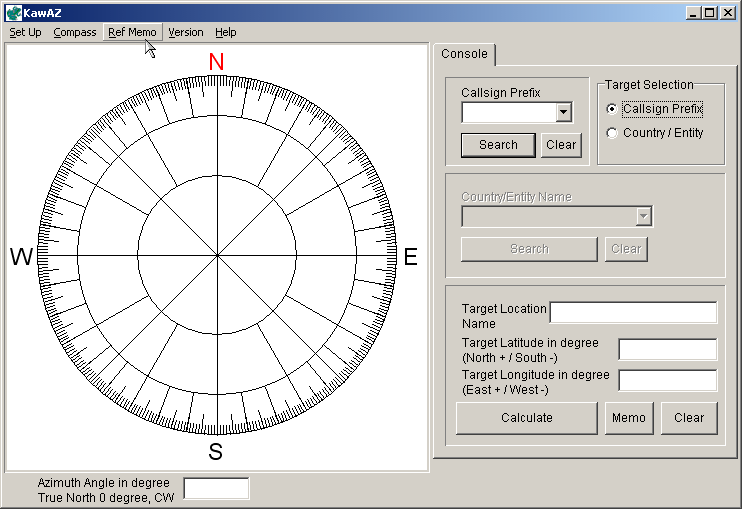
KawAZ is the Azimuth angle calculation program for Radio Amateur
1. General
It is sometimes annoying us to accurately point the beam of antenna toward the target location. It is actually hard job for juggling with the antenna rotator, key, microphone, spitting dial tuning, logs, etc. in actual operation. KawAZ is the software to save such chaotic state and relief you from one of these hassles.
KawAZ performs the simple geographical calculation of the beam heading direction on globe and it gives you the short pass direction. The result of calculation comes up with the image of direction compass to give you the visual and tangible understanding with regards to the beam heading direction.
2. Features
3. How to get KawAZ
The latest version can be found in the following site.
Latest version 1.24W dated 2 August 2004 Download
You can download by clicking above link and please save the file named KawAZxxxx.exe in somewhere in your pc. (where xxxx is a version number of KawAZ)
4. How to set up KawAZ (and un-install KawAZ)
(1) Before starting the set up please ensure three things;
1. Please read through to the end of this section 4. How to set up KawAZ, prior to start any set up work. The set up work to be done in two phases. One is extracting setup files from down loaded archive (extracting phase), and next is actual setup of KawAZ software (setup phase).
2. This is just for confirmation purpose if you coincidently have the software which has the same name of KawAZ (or kawaz, case non-sensitive) . Although it is hardly believable, if you already have the same name windows program or folder named 'KawAZ' (case non-sensitive) under your hard drive, c:\Program Files, the default set up may delete or overwrite your same name program. If it is the case please keep in mind that during the set up (in step (6) below), just after the License Agreement dialogue, you will be asked the KawAZ install folder and assign the folder that do not jeopardize your same name of software. i.e. you can assign, c:\Program Files\KawAZ2 in such a case.
If you have older version of KawAZ (older version of this software) you do not need to worry about this. Set up will just overwrite the older version.
3. Stop all application software before KawAZ set up.
(2) Start from extracting phase. Double click the icon of the downloaded KawAZxxxx.exe to start extracting from archive.
(3) UNZIPSFX dialogue Window pops up and asking 'Extract Folder'. Default Extract Folder is your current directory (down load folder). It is highly recommended to use the default folder, because this is just making set up folder and is NOT creating a KawAZ working folder.
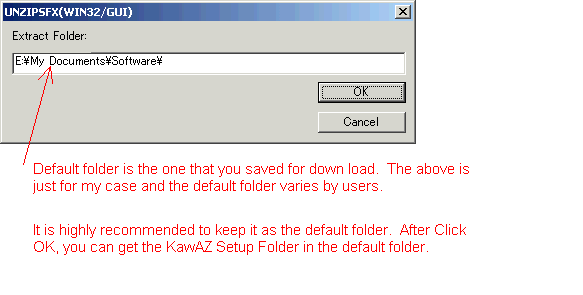
(4) Click 'OK' then KawAZ Setup folder to be created in the chosen folder and necessary files to be extracting from archive.
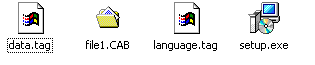
(5) Find the contents of 'KawAZ Setup' folder using Windows Explorer. In this folder you can find four (4) files shown below:
(6) Now you are in the setup phase. Double click setup.exe to start setup of KawAZ and follow the instruction and complete the setup.
(7) After set up of KawAZ, the 'KawAZ Setup' folder can be deleted if you wish. The KawAZ Setup folder and 4 files of contents are only for installation purpose and no longer required for actual KawAZ operation.
(8) In default set up, the following files are automatically installed in the folder at c:\Program Files\KawAZ\
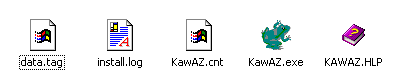
the 'data.tag' and 'install.log' are not related with KawAZ function but may be required for uninstallation, then please do not delete all these files and folder.
Once you started the KawAZ.exe, the KawAZ.ini file is created under c:\Program Files\KawAZ\ but it does not exist just after the installation. If you accidentally deleted KawAZ.ini, it does not affect the KawAZ function and performance at all. It makes the software in the state just after the installation, then you need to start from the home location registration in that case. (Refer to the following instruction guide)
Un-install can be done by un-installer in KawAZ start menu, and follow the instructions.
5. How to operate KawAZ
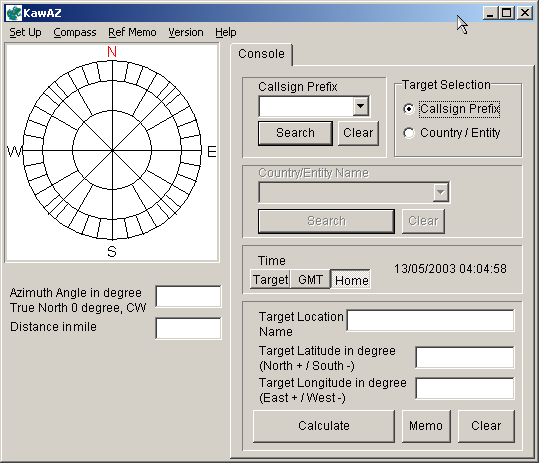
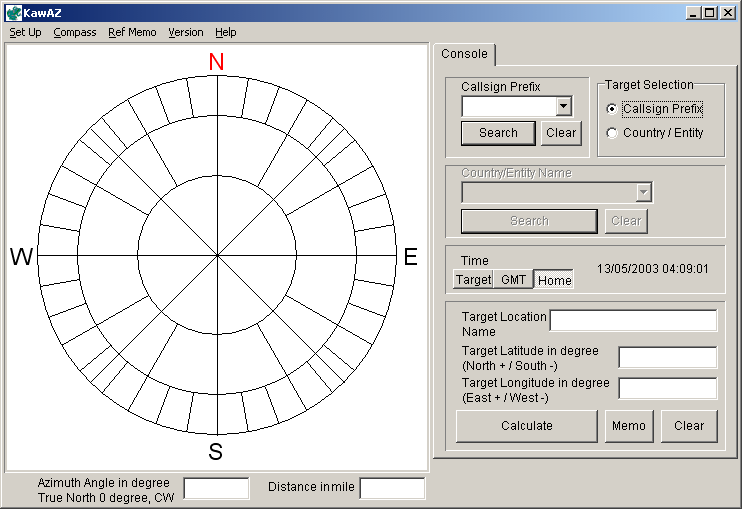
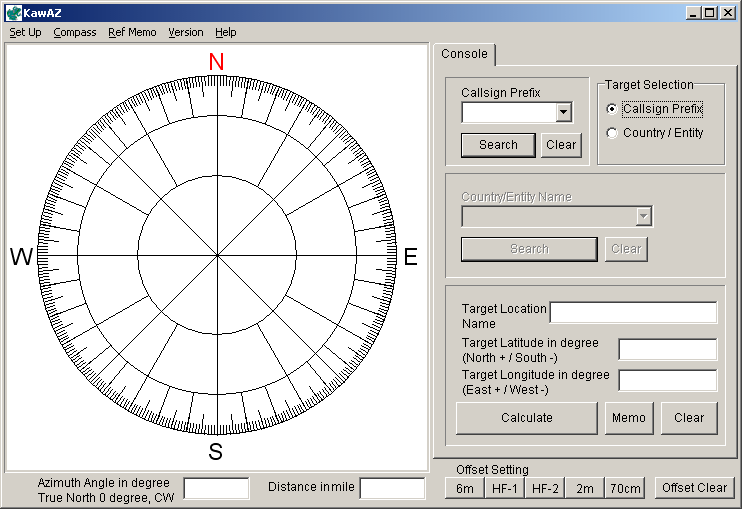
After starting up of KawAZ program, you can find the following Main window on your pc.
5.1 Initial Set-up
5.1.1 Home Location
(1) Click 'Set Up' on left end of Menu bar of Main window.
(2) Click 'Home Location' on the Dropdown menu list.
(3) Home Location window pops up as shown in below.
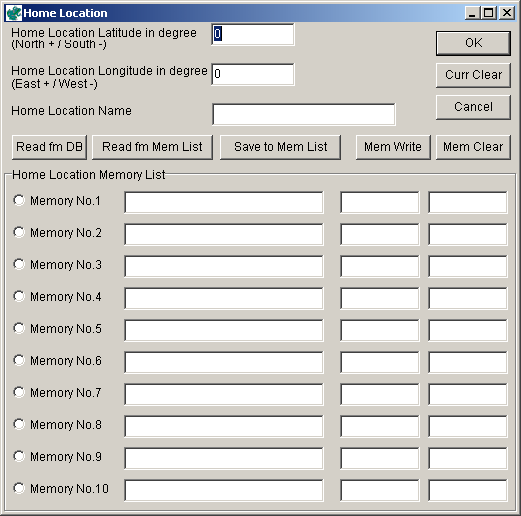
Now you can directly punch in your Latitude and Longitude. The Latitude and Longitude figures should be in the form of decimal system in degree such as '123.4567' and NOT in the form of '123deg. 27min. 22sec'.
The Latitude in North hemisphere is in the figure in + (plus) and South hemisphere is in the figure in - (minus).
The Longitude in East hemisphere is in the figure in + (plus) and West hemisphere is in the figure in - (minus).
However as for calculation no specific limits exist then the 10 degree of West hemi can be punch in as 350 degrees.
(4) or you can select your location from the database by clicking the button marked as 'Read fm DB'. When you click the 'Read fm DB' button, the following window pops up.

(5) Type your location callsign prefix in 'Your Location Callsign Prefix' box.
As for example, Ashfield in England to be assumed as your location and 'G' for the call sign to be type in. (Case NOT sensitive) Then soon after, the candidates of the Callsign Prefix are dropped down in the box. Then you can select 'G' or you just punch 'Enter' key, if it is already selected and highlighted.
Note; You can not select the prefix other than listed items. i.e. if you type 'G2' for the search, it does not work in the data base, then it should be selected from the drop down items list.
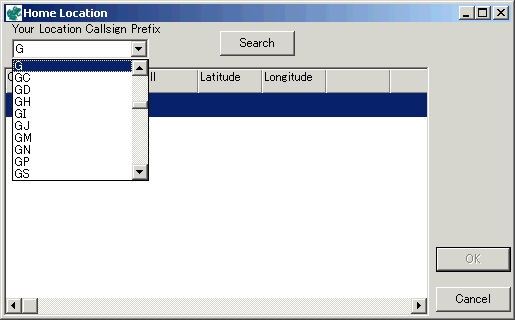
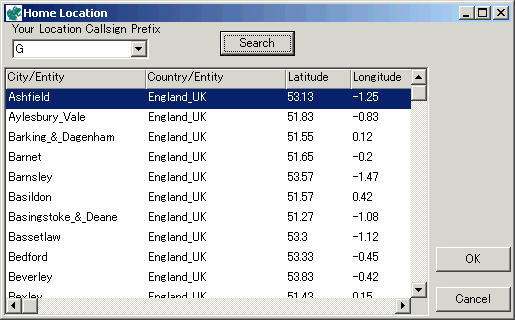
(6) Click 'Search' button then you get all location data match with the callsign prefix code.
Select the location and Click 'OK' button or double click the location in the table.
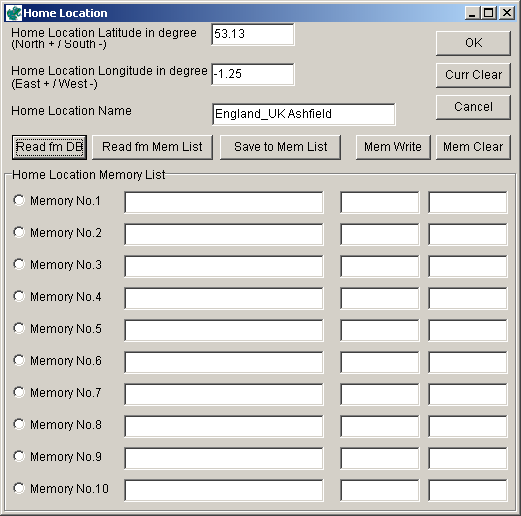
(7) Your Location data is now taken into the register form and now you can click 'OK' button to complete.
NOTE: If you get some alarm going off here, please try decimal point setting shown in next section.
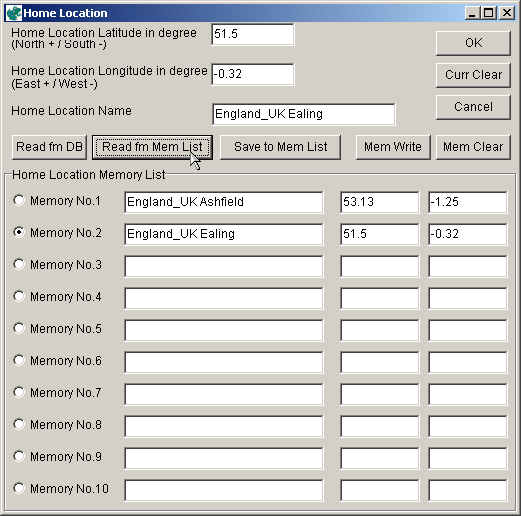
5.1.2 Home Location Memory Setting
(1) Click 'Set Up' on left end of Menu bar of Main window.
(2) Click 'Home Location' on the Dropdown menu list.
(3) Home Location window pops up as shown in below.
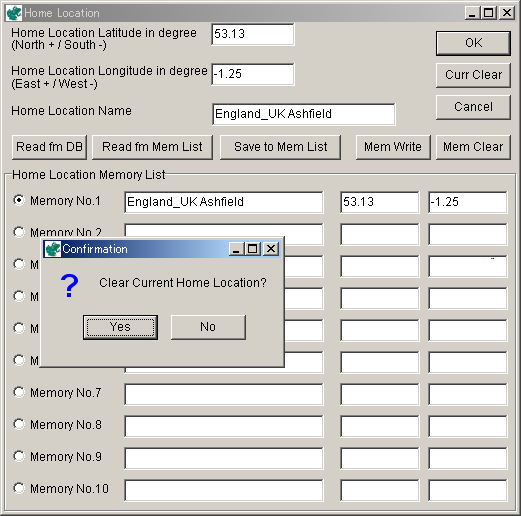
(4) Select Radio Button for the Home Location Memory Slot to be saved.
(5) Click 'Save to Mem List' button to transfer the current data to the selected slot of Home Location Memory. You can edit the data in the Memory List.
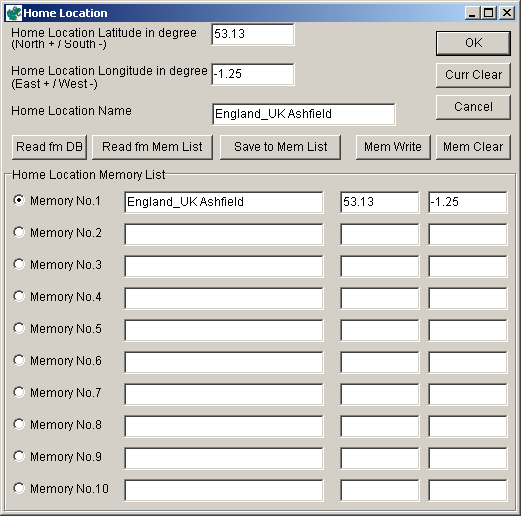
(6) Click 'Mem Write' button or 'OK' button to save in the Memory.
If the memory slots were occupied before, then you will get confirmation windows to over-write on each slot you've changed. The confirmation window is not coming appeared if the memory slot was vacant previously.
(7) To read the Home Location from Memory List, first you need to chose the Radio button of the Memory Slot number to be read out. Then Click 'Read fm Mem List' button, then selected Home Location data is transferred to current Home Location.
(8) To clear the Home Location from Memory List, first you need to chose the Radio button of the Memory Slot number to be cleared off. Then Click 'Mem Clear' button, then selected Home Location data is cleared after confirmation.
5.1.3 Decimal Point Character
Some of the countries or Areas in Latin America, i.e. Brasil, use a comma (,) instead of a period (.) for Decimal Point. KawAZ can cope with these variations. The indication of Database screen uses period (.) character as decimal point but when the data loaded from DB to calculation, the comma (,) character to be applied and use for calculation. The result can also be shown with this decimal character system. Then you do not need to change your local setting of pc.
(1) Click 'Set Up' on left end of Menu bar of Main window.
(2) Click 'Decimal Point' on the Dropdown menu list.
(3) Decimal Point set up window pops up as shown in below.
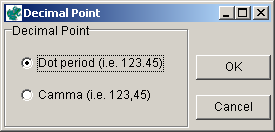
(4) Select your system to match with your PC local setting and Click 'OK'.
(5) Please be aware that after change of Decimal Point, you need to set up Home Location again, to over-write your Home Location data with new decimal point system.
NOTE: Alarm goes off at the time of calculation in case that the different decimal point system are chosen between your pc local setting and KawAZ setting.
5.1.4 Size of Compass Image
Small size compass image is selected after installation of KawAZ software, and the size of the compass image can be selected.
(1) Click 'Compass' on left end of Menu bar of Main window.
(2) Click 'Compass Size' on the Dropdown menu list.
(3) Compass size setup menu pops up as shown below.
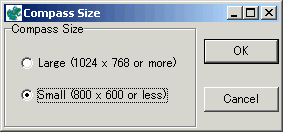
(4) Compass size changes by selection of 'Large' or 'Small' radio button and Clicking 'OK' button.
5.1.5 Compass Grid division
Compass grid division is set as 10degrees, 30degrees and 45degrees after installation of KawAZ software, in outer ring, mid ring and inner ring, respectively. These compass grid division can be selected in each ring, individually.
(1) Click 'Compass' on left end of Menu bar of Main window.
(2) Click 'Compass Division' on the Dropdown menu list.
(3) Compass size setup menu pops up as shown below.
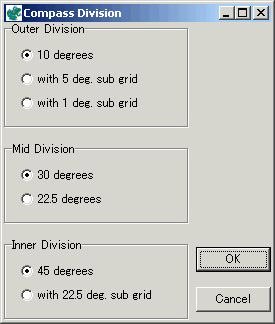
(4) Select and make your own compass and click 'OK' to complete.
Note; 1 degree grid on outer ring may not effective if you working with small compass size.
5.1.6 Compass Color
Compass color is set as White Background, Black Grid lines and Direction letters except N, Red Compass Arrow and letter of North, just after installation of KawAZ software. These color of components can be selected from various color selections, individually.
(1) Click 'Compass' on left end of Menu bar of Main window.
(2) Click 'Compass Color' on the Dropdown menu list.
(3) Compass Color setup menu pops up as shown below.
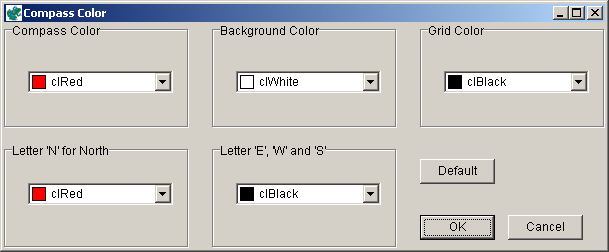
(4) Select your own color variations from these Color boxes. Various color code and sample colors drop down by click of delta sign at right end of each Color box.
(5) Click 'OK' after making up, then the color to be changed as shown below (Sample).
5.1.7 Distance to the Target Location
(1) Click 'Set Up' on left end of Menu bar of Main window.
(2) Click 'Show Distance' on the Dropdown menu list.
(3) Distance Setup window pops up as shown in below.
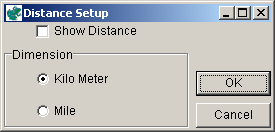
(4) Check the 'Show Distance' check box and select dimension of the Distance indication
(5) Click 'OK' to complete.
5.1.8 Local Time Zone Setting
On Main Window of KawAZ, Local Clock Timer shows Local Time of your Home Location, GMT (Greenwich Mean Time) and Local Time of Target Location. After calculation of Beamheading angle using Database, the Local Time of Target Location is shown on the screen. These three time can be selected by button beside the clock. The Date format can also be selected as per local rule.
For the proper date and time indication, it is required to setup the KawAZ Time Zone setting. to match with your PC local setting.
(1) To confirm your PC local setting double click the Windows clock on Task Bar.
(2) Click Time Zone tab and confirm the time zone setting on your PC.

(3) Then setup KawAZ Time Zone. Click 'Set Up' on left end of Menu bar of KawAZ Main window.
(4) Click 'Time' on the Dropdown menu list. Then Time Zone Setting window pops up.
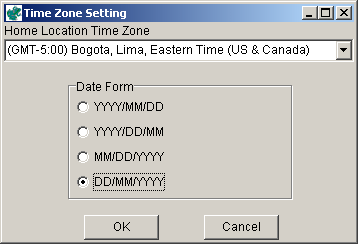
Note1: DST (Daylight Saving Time) is not considered in this program. Then if you have DST in your home location, please use -1 hour location than your PC Setting in KawAZ time zone setting..
Note2: Memory location that you have saved in previous version of KawAZ younger than 1.21W (inclusive) does not have the time difference parameter in the memory. Then if you recall the location from Reference memory or Working memory, it may not be a correct time. (GMT time to be shown). Then please re-store the memory after reading the data base so that time difference parameter to be saved on these memory.
5.2 Operation
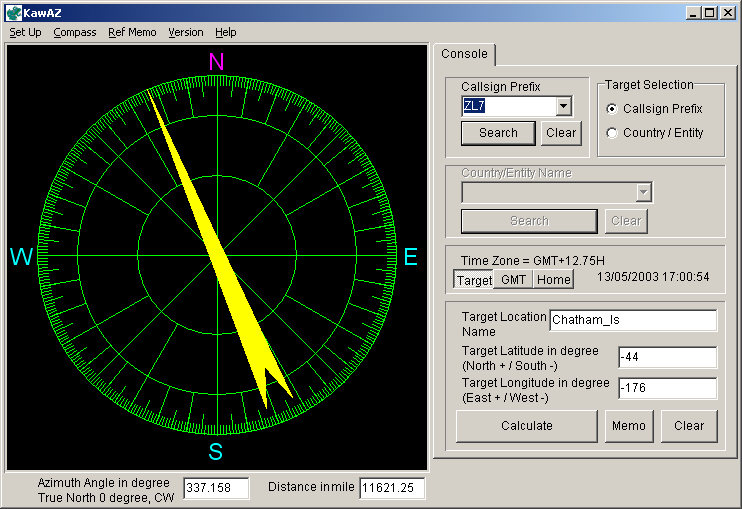
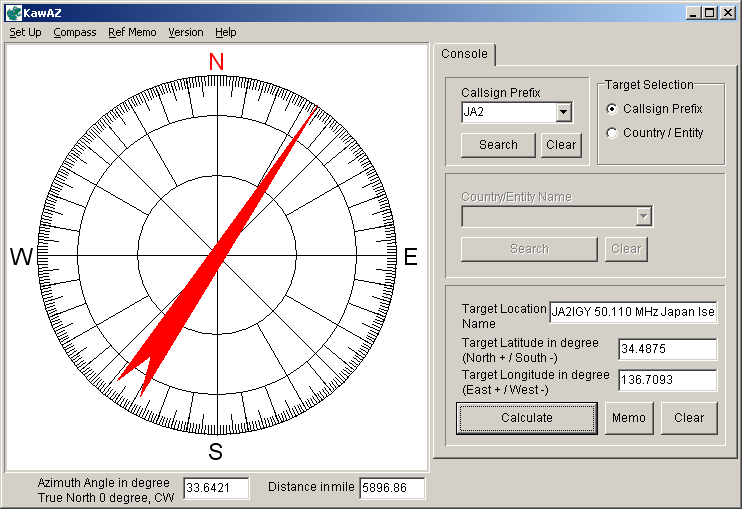
5.2.1 Search from Callsign prefix code
(1) Callsign prefix mode is selected after starting up the KawAZ program. Ensure that Callsign prefix mode is selected in 'Target Selection' on right up of main window.
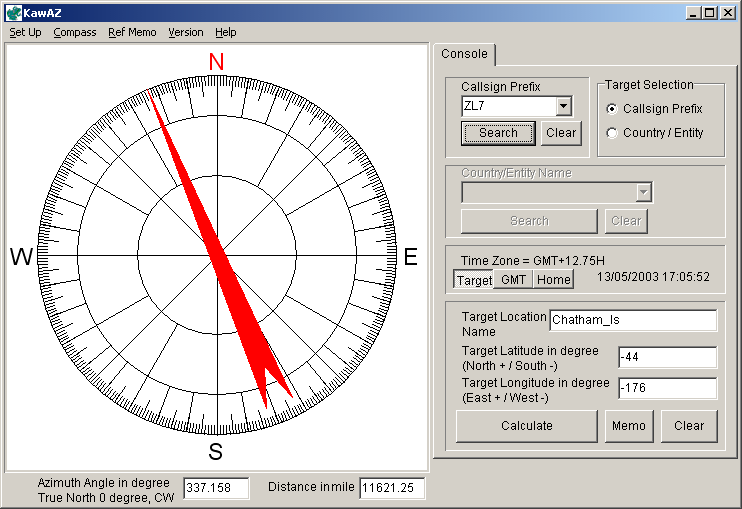
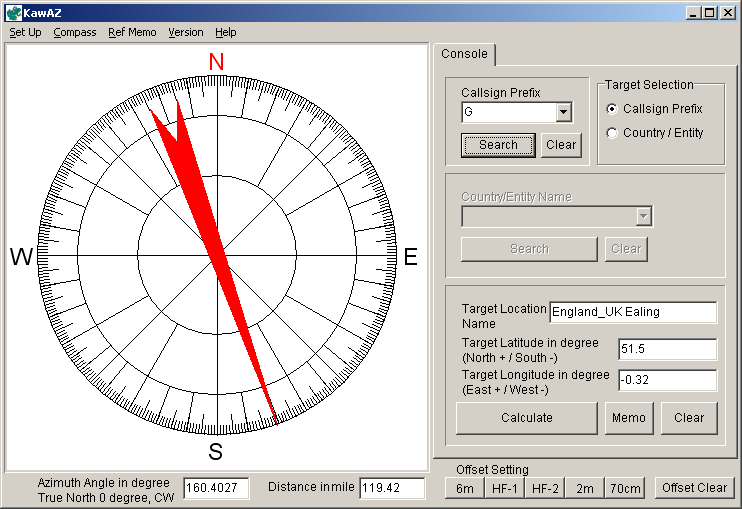
(2) As an example, try to find out the direction of ZL7 Chatham Island. Type Callsign prefix 'ZL7' in the box. (Case NOT sensitive)
Soon after type in ' Z ', the candidates of the Callsign Prefix are dropped down in the box. Then you can select 'ZL7' or you just punch 'Enter' key, if it is already selected and highlighted.
Note; You can not select the prefix other than listed items. i.e. if you type 'ZL7ABC' for the search, it does work in the data base, then it should be selected from the drop down items list.
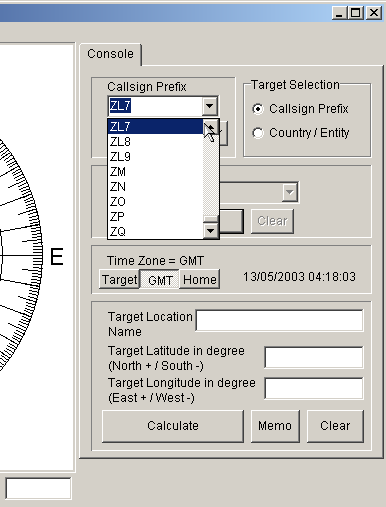
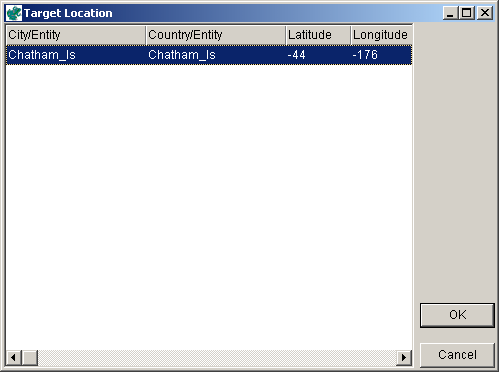
(3) Click 'Search' button, then you get all location data match with the callsign prefix code.
Select the target location and Click 'OK' button or double click the location in the table.
(4) The target location longitude and latitude are transferred to main window and calculation results (azimuth angle from your location) are shown in the box at bottom of main window and the azimuth direction is drawn on the compass.
5.2.2 Search from Country/Entity name
(1) Callsign prefix mode is selected after starting up the KawAZ program.
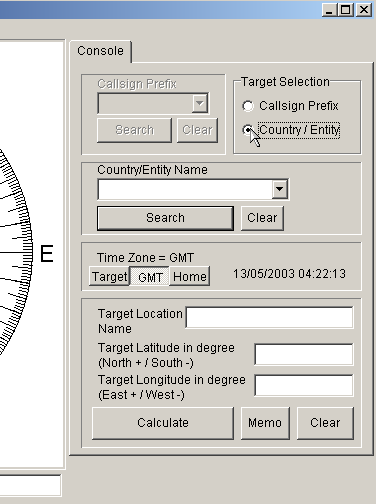
(2) Select 'Country/Entity' in 'Target Selection' on right up of main window. Then Country/Entity search area is enabled and Callsign Prefix area is disabled as shown below.
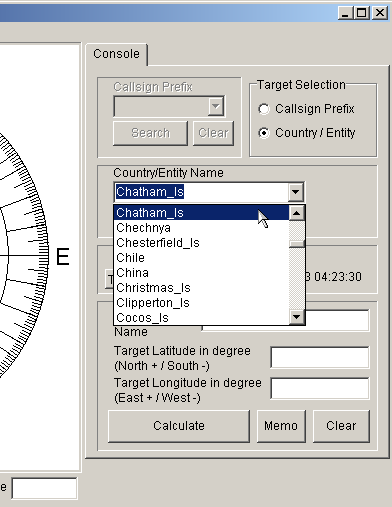
(3) As for example, try to find out the direction of 'Chatham Island'. Type Entity Name in the box. (Case NOT sensitive)
Soon after type in ' C ', the candidates of the Country / Entity names are dropped down in the box. Then you can select 'Chatham_Is' or you just punch 'Enter' key, if it is already selected and highlighted.
Note; You can not select the Country/Entity name other than listed items. i.e. if you type ' Chatham island ' or 'Chatham ISL' for the search, they do not work in the data base, then it should be selected from the drop down items list.
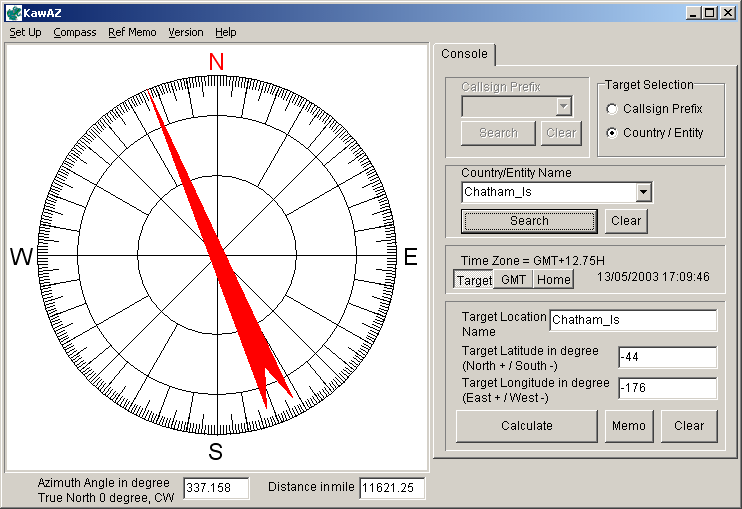
(4) Click 'Search' button, then you get all location data match with the County/Entity name.
Select the location and Click 'OK' button or double click the location in the table.
(5) The target location longitude and latitude are transferred to main window and calculation results (azimuth angle from your location) are shown in the box at the bottom of main window and the azimuth direction is drawn on the compass.
5.2.3 Direct key-in of Target Longitude and Latitude (No-data base search option)
(1) 'Target Selection' can be whichever the position, 'Callsign Prefix' or 'Country / Entity'. Actually this mode does not care the Target Selection mode.
(2) Latitude and Longitude of Target Location to be type in each box.
The Latitude and Longitude figures should be decimal system in degree such as ' 123.4567 ' and NOT in the form of '123deg. 27min. 22sec'.
The Latitude in North hemisphere is in the figure in + (plus) and South hemisphere is in the figure in - (minus).
The Longitude in East hemisphere is in the figure in + (plus) and West hemisphere is in the figure in - (minus).
However as for calculation no specific limits exist then the 10 degree of West hemi can be punch in as 350 degrees.
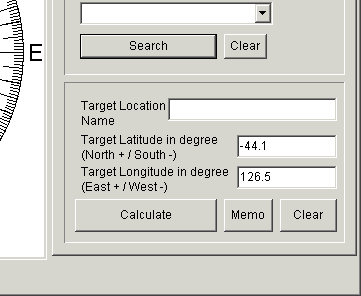
(3) Click 'Calculate' button and calculation results (azimuth angle from your location) are shown in the box at the bottom of main window and the azimuth direction is drawn on the compass.
5.3 Memory Function
5.3.1 Working Memory Write
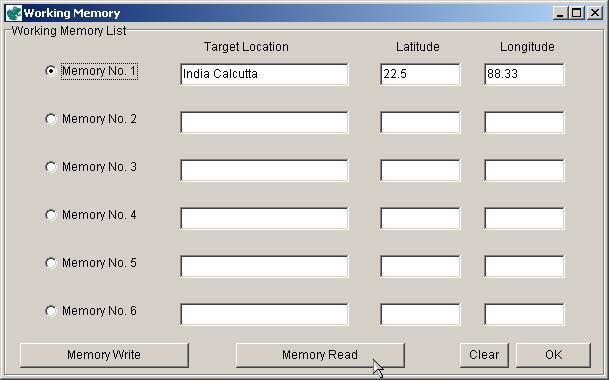
Working Memory is able to be used during the operation of KawAZ. Six (6) Memory slots are available for working memory. KawAZ gets hold of the contents of memory even after the rebooting of your pc. The Memory Data is stored in the form of its location data, NOT in the form of calculation results. The azimuth angle calculation is done at each time of the memory location retrieve, then if you move your operation location after the memory store, the calculation results still valid from your new location.
(1) Click 'Memo' button while the azimuth calculation results are shown on the window.
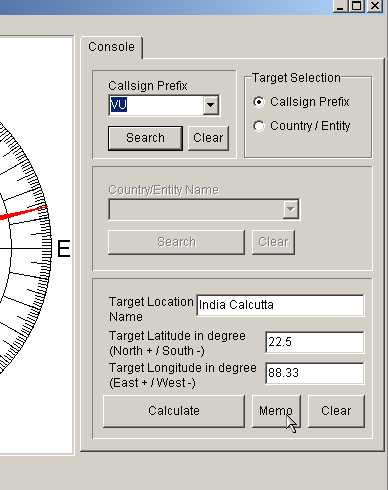
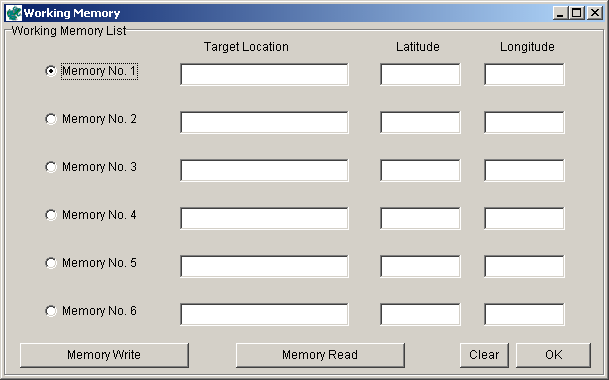
(2) The following Working Memory window comes out.
(3) Select Memory Number to store the data by clicking the radio button of each Memory location. (Note*1)
(4) Click 'Memory Write' button at the bottom of the left.
(5) The Memory Location window dismissed and the data is stored in the selected Memory location. (Note *2)
Notes
*1: Vacant memory location is automatically selected when you open this Working Memory window if any vacancy available in the list. This is to reduce your action to operate KawAZ. Then if you have any vacancy in the slot, you just need to open this window and press the 'Memory Write' button at left end corner to complete the Working Memory write procedure.
*2: If you select the memory location that has previously recorded, the memory writing process simply over-write the location data. There is no over-write confirmation window in Working Memory, for quick operation of user. (but, Reference Memory has it)
5.3.2 Working Memory Read
This section describes how to retrieve the stored Working Memory data.
(1) Click 'Memo' button as same as Working Memory Write procedure.
(2) The following Working Memory window comes out with the list of six (6) memory slots.
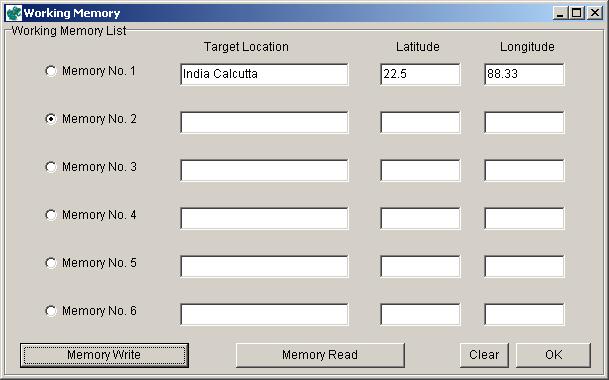
Having explained in the above Working Memory Write procedure, the vacant memory slot is automatically selected just after opening this window. (In the above screen shot, the Memory No.2 has been selected)
(3) Click the radio button of the memory slot to retrieve, and Click 'Memory Read' button.
(4) The Working Memory window is dismissed and location data are retrieved for the selected target location and azimuth angle calculation results are shown on the main window.
5.3.3 Working Memory Clear
(1) Click 'Memo' button and open the Working Memory window.
(2) Select Memory Location to be cleared.
(3) Click 'Clear' button to complete the Working Memory Clear. There is no clear confirmation window in Working Memory, for quick operation of user. (but, Reference Memory has it)
5.3.4 Reference Memory Write
Reference Memory is able to be used for long term store of the location data that you frequently access in KawAZ. Ten (10) Memory slots are available for Reference Memory. KawAZ gets hold of the contents of memory even after the rebooting of your pc. The Memory Data is stored in the form of its location data, NOT in the form of calculation results. The azimuth angle calculation is done at each time of the memory location retrieve, then if you move your operation location after the memory store, the calculation results still valid from your new location.
(1) Click 'Ref Memo' button on KawAZ menu bar on the main window.
(2) The following Reference Memory window comes out.
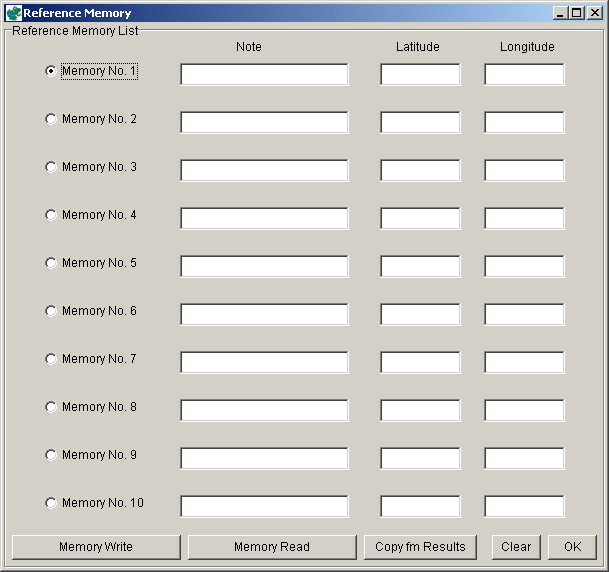
(3) Select Memory Number to store the data by clicking the radio button of each Memory location.
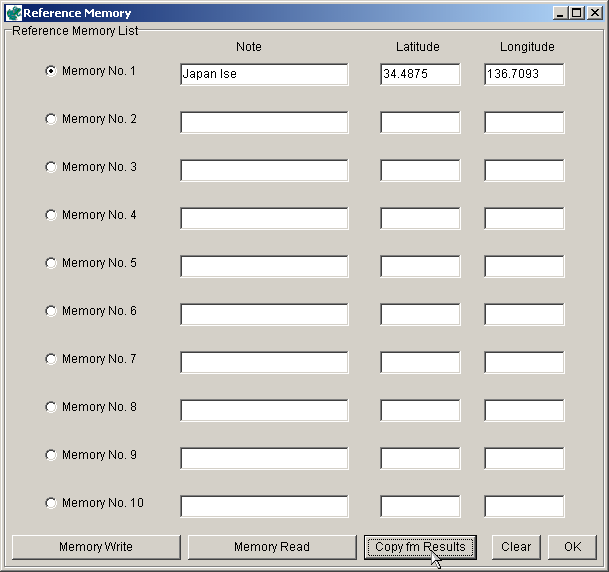
You can directly type the data in the Memory location, but if you have any calculation results before opening of Reference Memory Window, you can copy the data from the main window of KawAZ. In this case you just need to click 'Copy fm Results' button.
(4) Reference Memory has edit function in each boxes though Working Memory doesn't, then you can edit more accurate location or its location name.
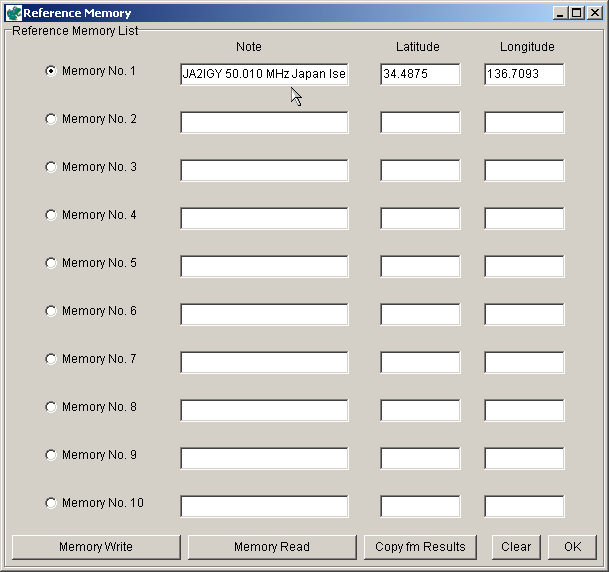
(5) Click 'Memory Write' button at the bottom of the left.
If the memory slots were occupied before, then you will get confirmation windows to over-write on each slot you've changed. The confirmation window is not coming appeared if the memory slot was vacant previously.(6) Click 'OK' to return to KawAZ main program window.
5.3.5 Reference Memory Read
This section describes how to retrieve the stored Reference Memory data.
(1) Click 'Ref Memo' button on KawAZ Menu bar as same as Reference Memory Write procedure.
(2) The following Reference Memory window comes out with the list of ten (10) memory slots.
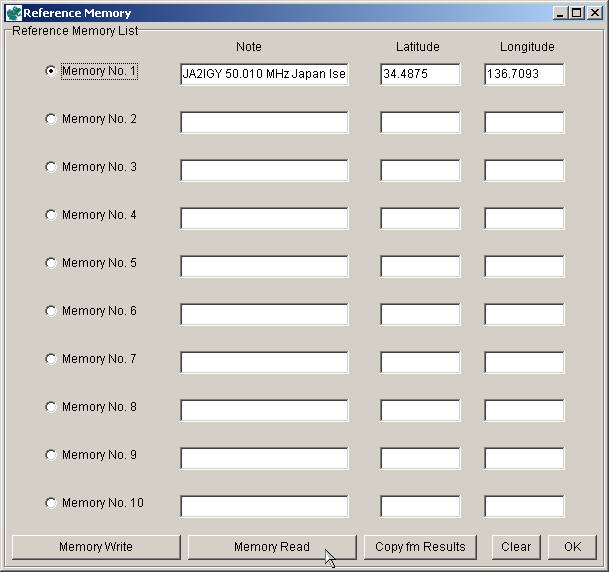
(3) Click the radio button of the memory slot to retrieve, and Click 'Memory Read' button.
(4) The Reference Memory window is dismissed and location data are retrieved for the selected target location and azimuth angle calculation results are shown on the main window.
5.3.6 Reference Memory Clear
(1) Click 'Ref Memo' button on menu bar and open the Reference Memory window.
(2) Select Memory Location to be cleared.
(3) Click 'Clear' button then you will get confirmation window to clear the memory slot.
(4) Click 'OK' button to complete the Reference Memory Clear at selected slot.
5.4 Offset Function
Offset Function description can be shown in this document. KawAZ Offset Setting
This section shows how to set up the offset function.
(1) Click 'Compass' on menu bar.
(2) Click 'Compass Offset' then the following screen comes out.

(3) Five (5) sets of Offset can be preset. The followings are the parameters of each boxes.
| Check Box | Offset button show switch. If you check this box, Offset button switch will be visible. |
| Note | The note in this edit box will coming appeared on each offset button. Most of the case the antenna name or Frequency will be assigned here. Although no Max. characters, up to 5 or 6 character can be shown on each offset button. |
| Grid Offset | Grid Offset value to be given in degree (i.e. 45, -90) |
| Compass Offset | Compass Offset value to be given in degree (i.e. 10, -5) |
Details description for Grid Offset, Compass Offset and how to apply these parameters can be shown in this document. KawAZ Offset Setting
(4) The followings are setting example.
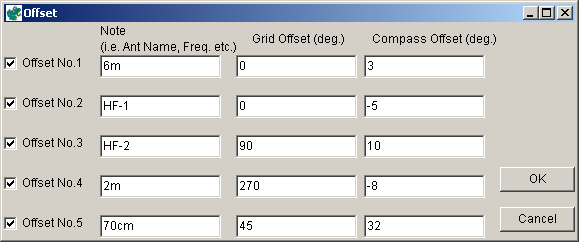
(5) Click 'OK' to complete the offset setting.
(6) Then Offset buttons are shown at bottom of right. (They will be shown bottom of left in the case of small Compass size indication.)
The buttons you never chosen by check box will not be coming appeared.
(7) Click the required offset button to apply the offset angle. By clicking of 'Offset Clear' button, the offset can be dismissed on the results. Offset is applied to Compass image only and azimuth angle at the bottom left shows the value without offset angle.
For your reference the followings are the compass image without Offset angle.
The followings are the case that Offset for 70cm has been applied.

The outline compass shows true direction and painted compass shows the image to be applied on your rotator controller. You just need to apply this image to get the right direction on your actual antenna.
5.5 Decimal - Deg. Min. Sec. Calculation
![]()
(1) To calculate Decimal value from Deg. Min. Sec. value, ' Calculation tab ' to be clicked.
(2) The Deg.Min.Sec. value to be placed into the appropriate boxes. Nil to be identified as '0'. The value exceeding 60 min and 60 sec are automatically translated into proper value, i.e. 123 deg. 120 min is calculated as 125 deg.
(3) Click ' To decimal ' button to translate into decimal value.
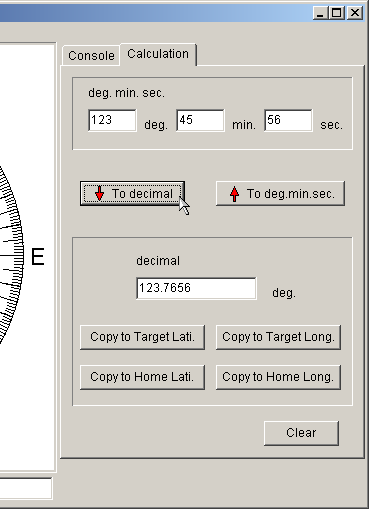
(4) Resulting Decimal value is shown in the box titled 'decimal'.
(5) To copy and paste the calculated value into Target location or Home location, the following buttons to be clicked.
'Copy to Target Lati.' : Copy and paste the calculated value into Target Location Latitude.
'Copy to Target Long.' : Copy and paste the calculated value into Target Location Longitude.
'Copy to Home Lati.' : Copy and paste the calculated value into Home Location Latitude.
'Copy to Home Long.' : Copy and paste the calculated value into Home Location Longitude.
(6) When Home Location is selected to copy and paste, the following confirmation window is popped up and copy and pasted after the confirmation of change of current home location.
(7) Calculation from Deg.Min.Sec. value to Decimal value is place the Decimal value first and click 'To Deg. Min. Sec.' button.
6. World location prefix database criteria
The world location prefix index database has been made by JH0CJH / JA1CTV in the following basic criteria.
(1) All cities and regions having population over 100k, constitute the database. However the case that the huge numbers of cities and regions having the population over 100k are existing in the country or entity, it makes just difficult to find out the target location from the database even after the filtering of data. In such the case, only major cities or capitals in the provincial area constitute the database. i.e. India, China, etc.
(2) On contrary, the DXCC listed entities constitute the database even it has less 100k population.
(3) In certain country or entity, in the case that the prefix assignment policy with area code is clearly defined by autonomy, these prefix index keys are used in such country or entity, to make accurate filtering of database. For example, Japan has stringent definition of area number following 2 letters of prefix, such as JA0, JH2, 7K1 etc. All cities and regions selected by criteria (1) above, are sorted out in each prefix with area numbers in such country or entity. However if some area does not have a city having population over 100K, the database would miss such area's prefix index. To avoid such case, and to keep the consistency of the database, the cities and regions in such area constitute database even it has less 100k population.
(4) On contrary, the country or entity has geographically small area are recorded in single item or just couples of locations, even it has clear definition of the area code in prefix index.
If you find some missing entities please let me know the details to improve the database.
7. General License Agreement
7.1 KawAZ is Freeware, provided that private persons use KawAZ software while the use is private and non-commercial purpose.
7.2 KawAZ and its archived files must be distributed with every copy of contents. It should not be removed or modified. This information pertains to all use of this software worldwide.
7.3 Decompile or disassemble (Reverse Engineering) of the KawAZ software is strictly prohibited.
7.4 KawAZ is licensed as one single product. You are not allowed to separate its components to use them for other purpose than azimuth angle calculation for Amateur Radio.
7.5 KawAZ is freely distributable to anyone and everyone as long as it is distributed in UNMODIFIED FORM and no fees are charged.
7.6 No Warranty available for KawAZ software. Copyright holder does not have any obligation of future update or upgrade.
7.7 Basically No Support available for KawAZ software and related documents, from copyright holder. However the copyright holder will make an best effort to respond to any questions or requests related with KawAZ software and its documents, only by way of E-mail communications, written in English or Japanese. Please do not attach any files or screen shot in this case. The mails with any attachment files will be automatically discarded due to security reasons. No telephone, snail mail communications support are available.
Contact e-mail: jh0cjh@yahoo.co.uk
Location of the latest version of KawAZ : http://www.kawauchi.homeip.mydns.jp/KawAZ/
8. Limitation of Liability
JH0CJH / JA1CTV the owner of the copyright of KawAZ software takes no responsibility for the accuracy or validity of any claims or statements contained in the software program and documents related with this software. The software program and documents related with this software is provided without warranty of any kind. In no event shall JH0CJH / JA1CTV the owner of the copyright be liable for any damages whatsoever, including special, direct or indirect or consequential damages, arising out of or in connection with the use, non-use, installation, un-installation or performance available.
9. Copyright
KawAZ, Copyright (c) 2002 - 2004 Toru Kawauchi JH0CJH / JA1CTV Japan. All right reserved.
Note: The picture of icon of FROG ('Kaeru' or 'Kawaz' in Japanese) are derived from Microsoft clipart library. The copyright of the picture are reserved by Microsoft Corp.
10. Tips
KawAZ is just making a calculation of beam heading direction in geographical method. However the actual propagation is totally different from such simple calculations, such as an effect of status of ionosphere, scatter, ducts, scintillation, etc. The propagation condition depends on the nature effects and it is the act of God. Though IT technology improved and gave us the drastic change of life in last decades, nobody, despite of their cutting edge technologies, could invent the wonderful tools for the antenna pointing with having a calculation taking into account such actual propagation conditions. Actually, I'm not expecting such tools to be created in near future because such wobbling and fluctuation are one of the interests of Radio Amateur, don't you think so? But.....If somebody invents or knows the software having the calculation with such features, please let me know, I need to ask my wife to give up next holiday, to save for such cool tool.... and hopefully it could be a freeware as same as KawAZ so that we can enjoy small holiday, please !
11. Special Thanks to
12. Revision History
Enjoy DX mate !
Toru Kawauchi JH0CJH / JA1CTV 8 December 2002, first release de Sao Paulo, Brasil
(end of file)